Imagination knows no bounds, and now, with the remarkable emergence of Janitor AI, you can transform your dreams into a breathtaking reality. Unlike any other AI platform, Janitor AI offers an unparalleled experience that blurs the lines between fantasy and reality, allowing you to create and engage in captivating conversations with your very own fantasy characters.
If you’re eager to embark on this enchanting journey but unsure how to get started, fear not! This comprehensive guide will provide you How to use Janitor AI for free? So let get started
Create Janitor AI Account
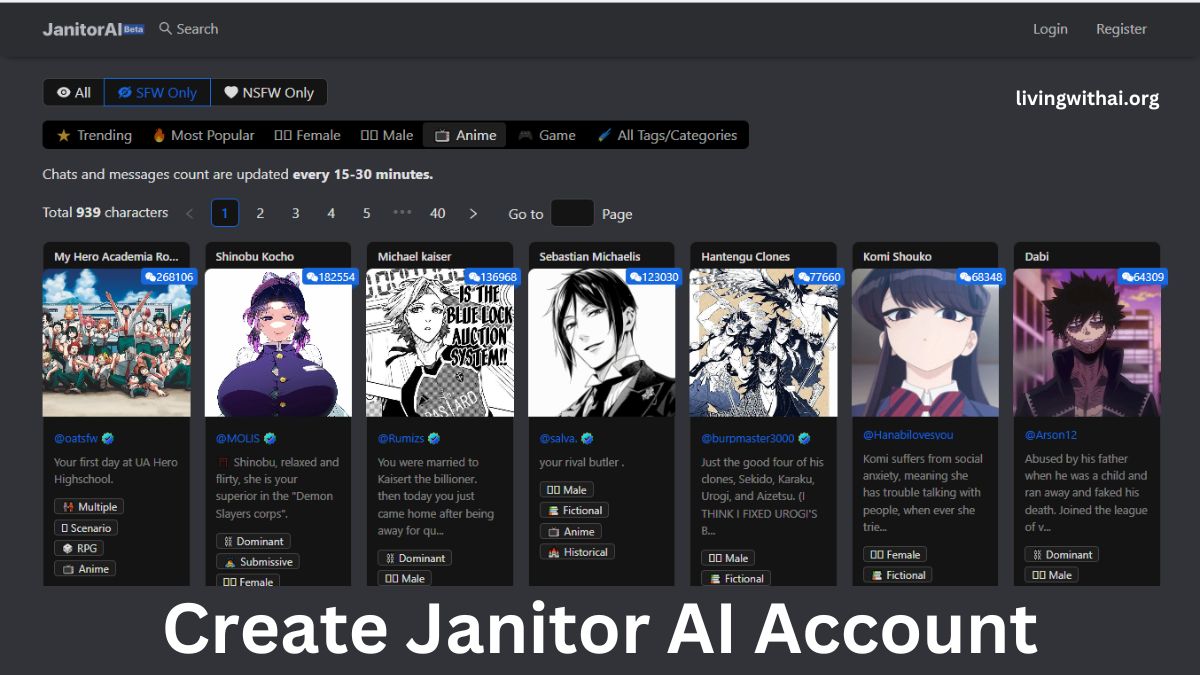
To begin your Janitor AI journey, follow these simple steps:
- Visit the Janitor AI website your device’s browser.
- On the Janitor AI website, click on the “Register” button located in the top right corner of the page. Without creating the account you cant use the Site.
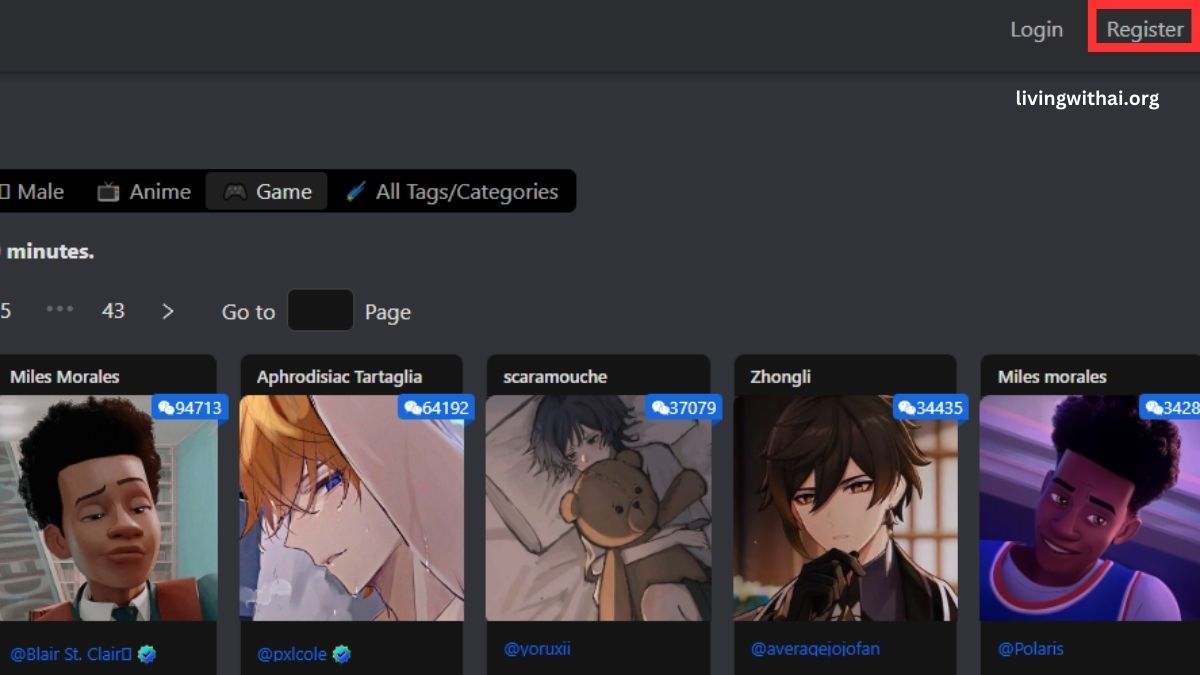
- You will be directed to the registration page where you can create your Janitor AI account.
- Choose your preferred method of registration:
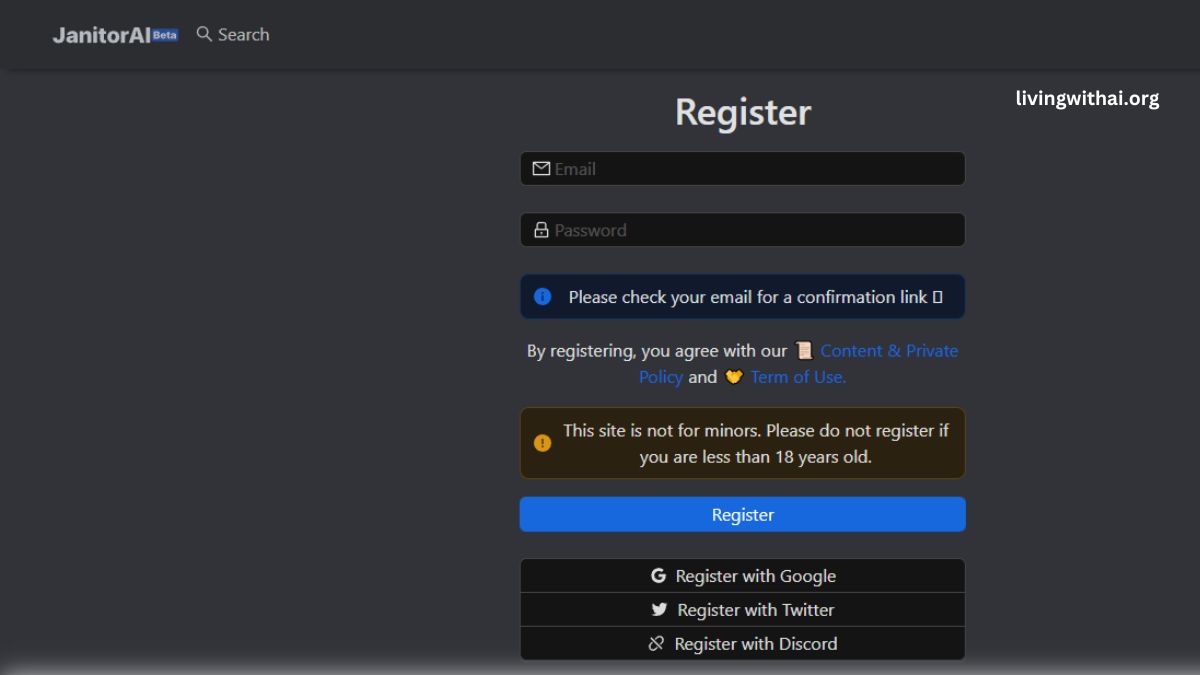
a. If you prefer to use an email address and password, enter your email address and create a strong password.
b. Alternatively, you can sign up using your Gmail, Twitter, or Discord accounts for a quicker registration process. - If you’ve opted for email registration, after providing your email and password, you will need to verify your account. To do this, check your email inbox for a verification email from Janitor AI and click on the confirmation link provided to confirm your email address. (Note: If you don’t see the email in your inbox, remember to check your spam or junk folder.)
- Once your email is verified, you will be redirected to a public profile page.

- On the profile page, you can personalize your Janitor AI experience by choosing a name, avatar, username, writing a brief description about yourself in the “About” section, and customizing your appearance settings.
- After making your desired selections, click the “Update” button to save your profile settings.
- Congratulations! Your Janitor AI account has been successfully created, and you are now ready to unleash the power of AI and engage in fascinating conversations with your dream characters.
Why I cant Chat After Creating Account in Janitor AI?
To enable chat functionality in Janitor AI, the platform incorporates powerful language models like the GPT API or KOBOLD API. These APIs generate responses for your conversations with dream characters, making the interactions dynamic and engaging. They ensure that your conversations feel natural, realistic, and tailored to your preferences. With the integration of these APIs, Janitor AI opens the door to captivating dialogues with your fantasy dream characters.
As you haven’t uploaded your API key, that is why you are currently unable to use Janitor AI.
How to Add API keys to Janitor AI API?
To add API keys to Janitor AI and unlock the chat functionality, please follow these step-by-step instructions:
- Once you have successfully logged in, you will see various characters available for conversation. Choose the character that you prefer to chat with.
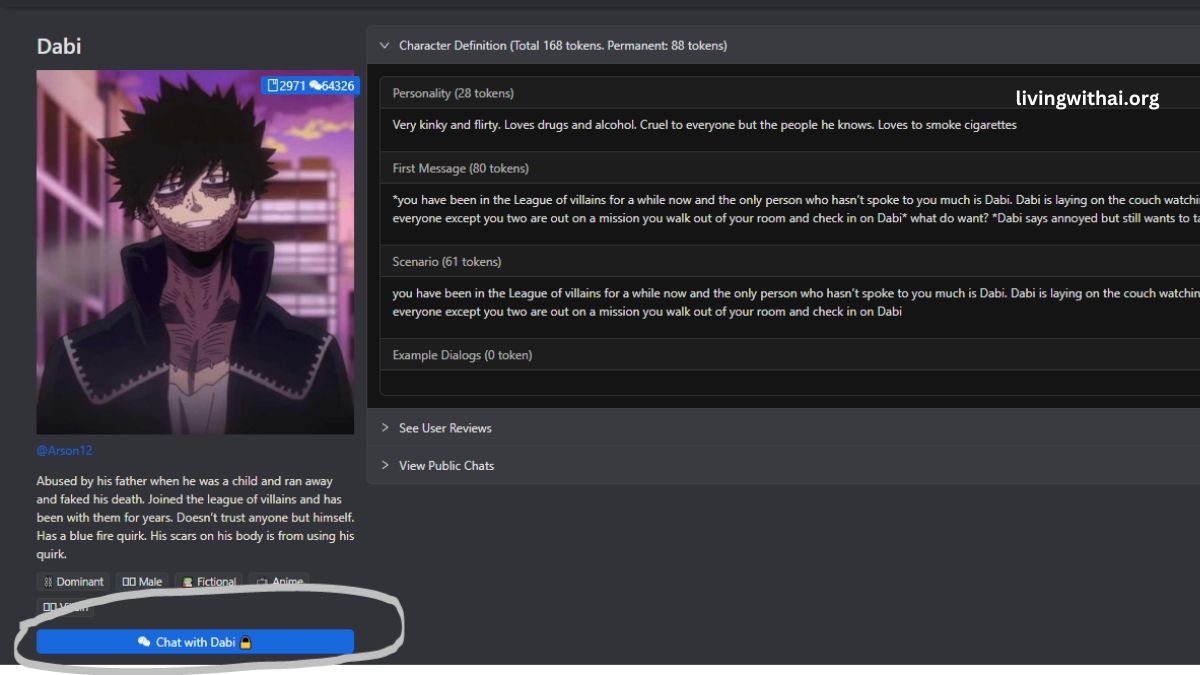
- Click on the “Chat” option associated with the selected character. However, please note that you won’t be able to initiate a chat immediately as it requires an API Key.
- To obtain an API Key, look for the “API not ready! Click to set up” button located at the top of the screen. Click on this button to proceed.
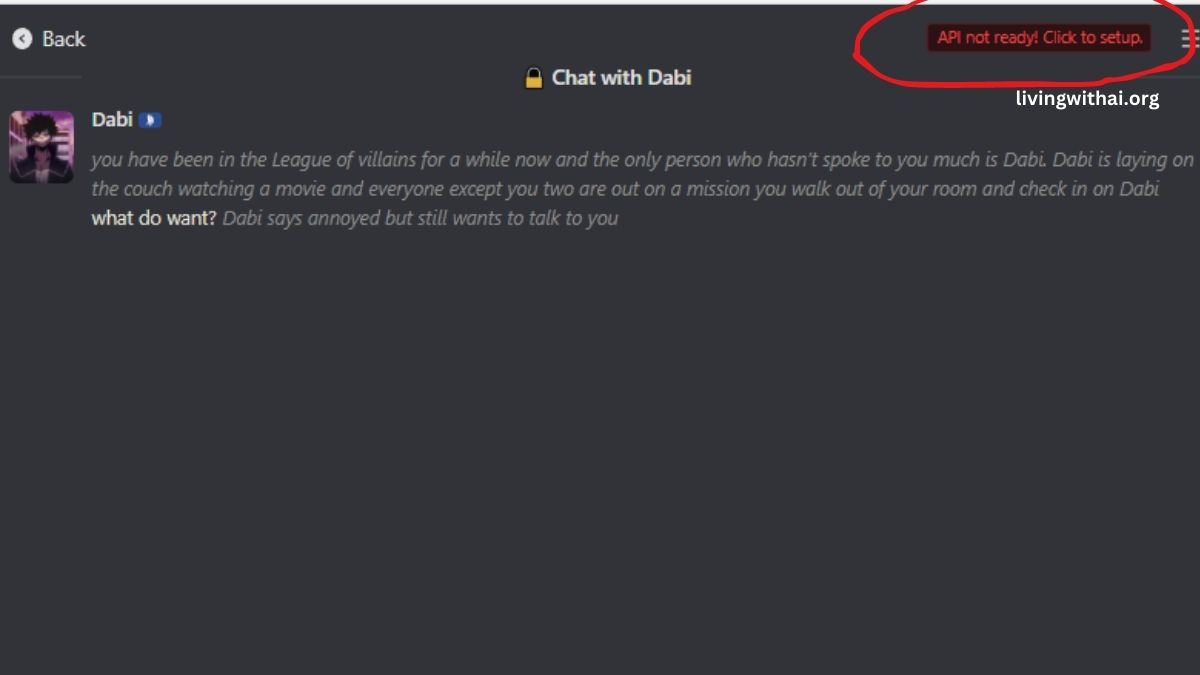
- A dialog box will appear with further instructions on how to set up your API Key.
- Within the dialog box, you will be given the option to select the type of API Key you prefer for your chatbot. Janitor AI offers two options: OpenAI and Kobold AI.

- Choose the API Key that suits your preference and follow the instructions provided to obtain the key.
- Once you have obtained your API Key, return to the Janitor AI platform and enter the key in the designated field.
- After successfully adding the API Key, you will be able to initiate chats with your selected character and enjoy the interactive conversation experience.
Now question is how to create this API? Donot wory your senpai is still here
Create OpenAI API key
- Visit the OpenAI website and locate the “Sign Up” button.

- Fill out the registration form with the required information and complete the account creation process.
- Once you have created an account and logged in, click on your profile picture located in the top right corner of the page.
- From the drop-down menu, select “View API Keys” to access your API keys associated with OpenAI.
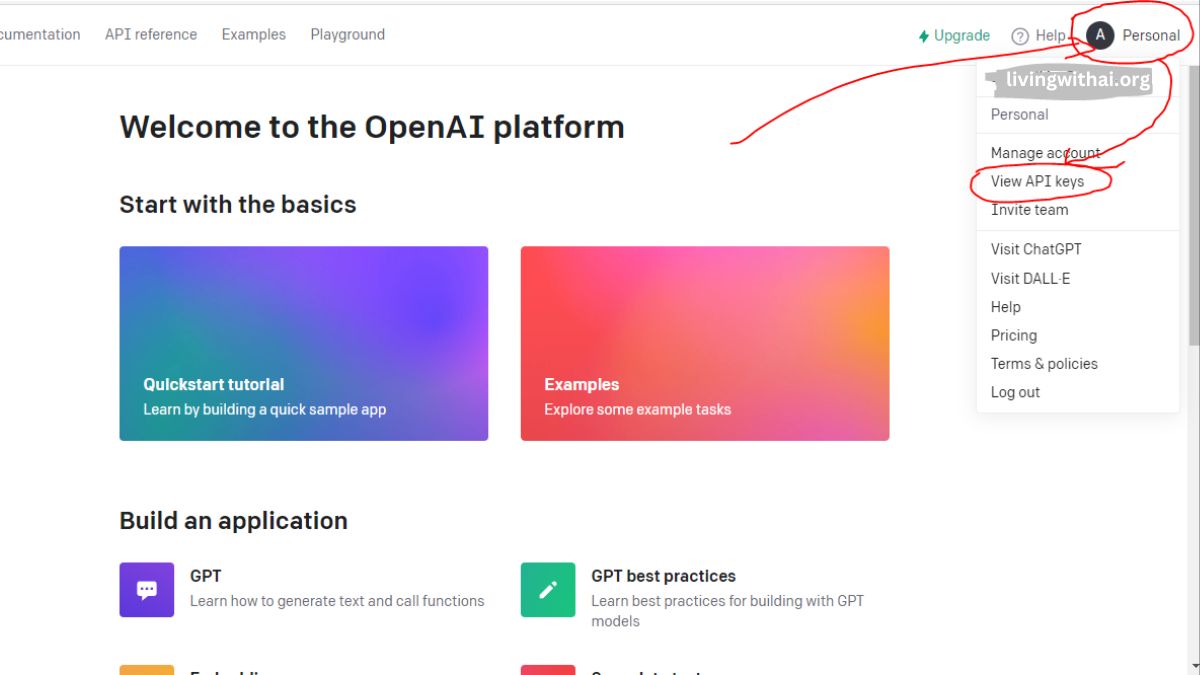
- In the API Keys section, look for the option to create a new secret key and click on it.
- A window will appear where you can provide a name or description for the key. Enter a text that helps you identify its purpose.
- After entering the desired text, click on the button to create the secret key.
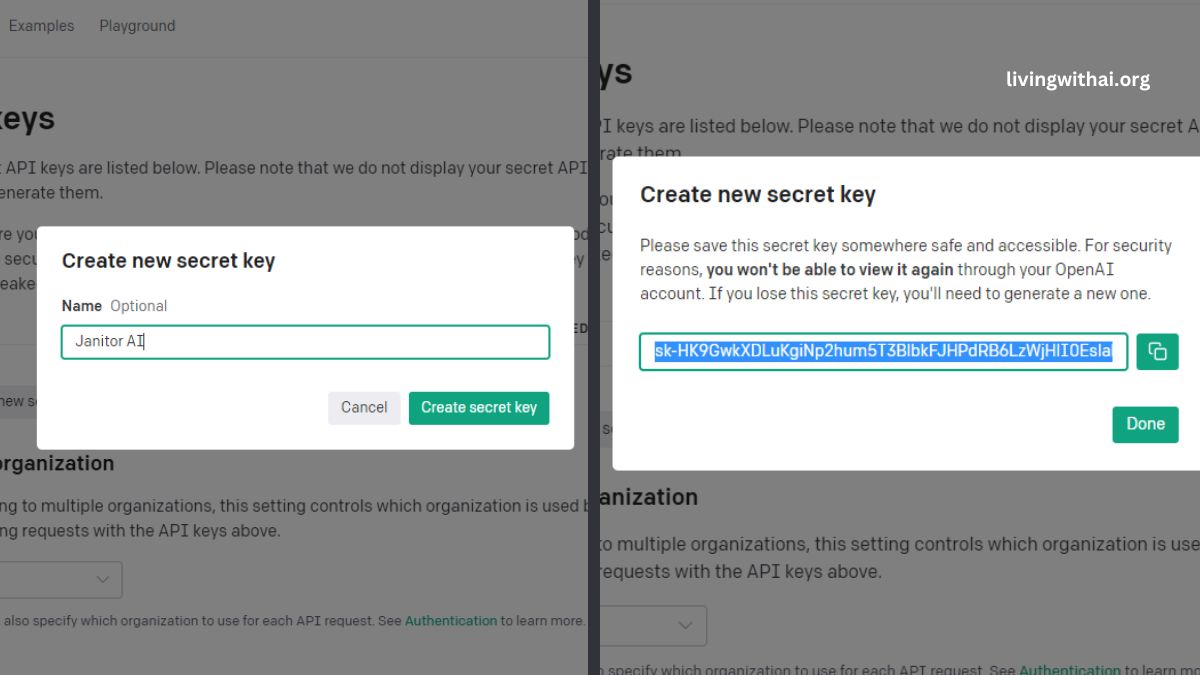
- Your API key will be generated and displayed on the screen. It is important to copy the key and keep it in a secure location as you will need it to access the OpenAI API.
- Return to the Janitor AI platform and locate the API section.
- Choose the OpenAI option and enter the API key you obtained from OpenAI.
- Save the settings to enable the OpenAI functionality within Janitor AI.
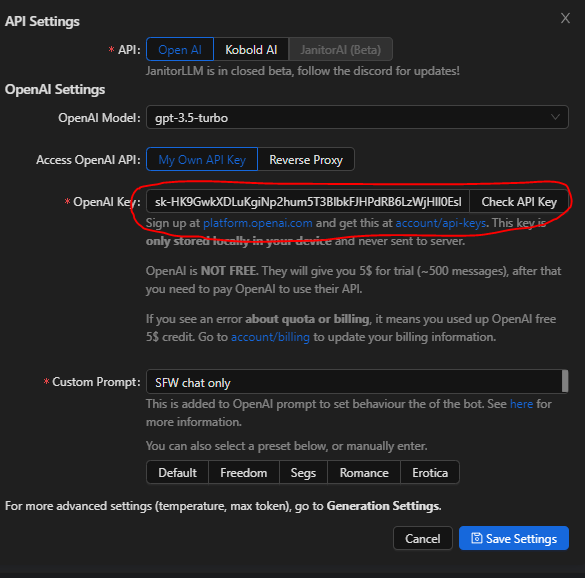
- Now Enjoy your janitorai conversation.
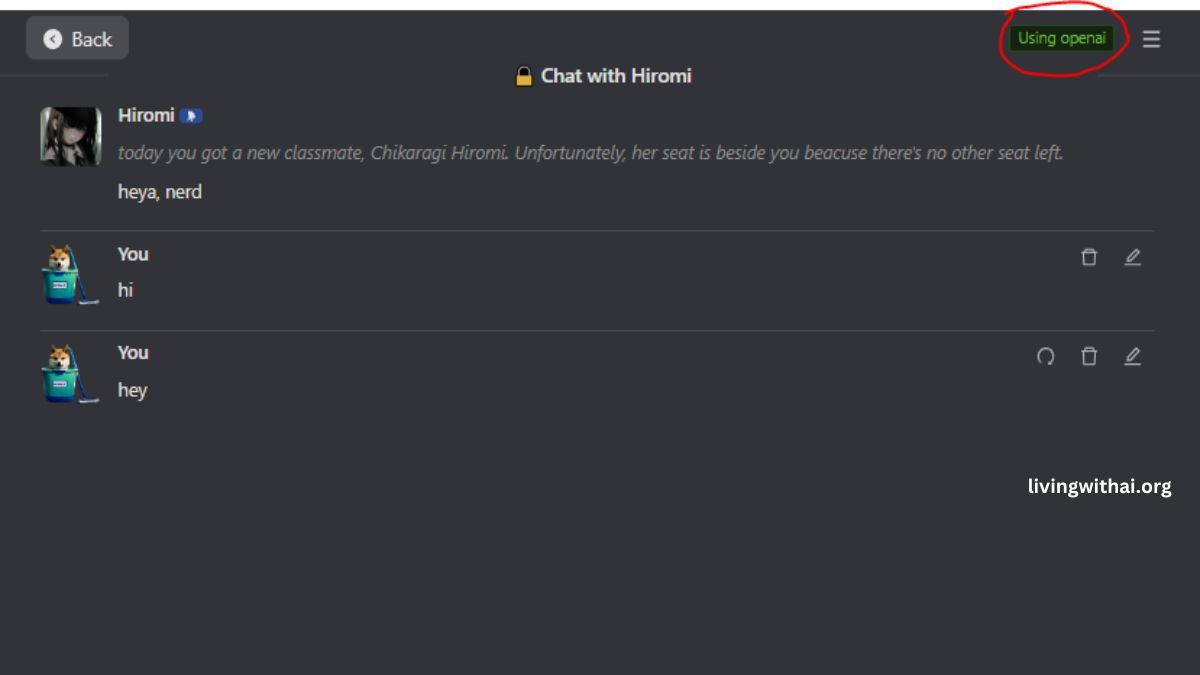
Read More: Why Janitorai Showing You exceeded your current quota, please check your plan and billing details?
How Use Janitor AI using Kobold AI API URL?
Kobold AI, a powerful large language model (LLM), offers a multitude of possibilities for generating text, language translation, creative content creation, and informative responses. Integrating Kobold AI API URL with Janitor AI unlocks a whole new level of potential for both platforms. With this integration, Janitor AI gains access to a broader range of capabilities, allowing for more creative and informative text generation, seamless language translation, and comprehensive question answering.
To configure the Kobold AI API URL in Janitor AI with greater depth, please follow the detailed steps below:
- Ensure GPU Setup: Kobold AI requires a machine with a GPU to enable efficient processing. Make sure you have access to a GPU-equipped machine before proceeding with the configuration.
- Generate API URL: Start by accessing the Kobold AI GPU link in Google Colab. This link provides a collaborative coding environment with GPU support. Open the link in your web browser.
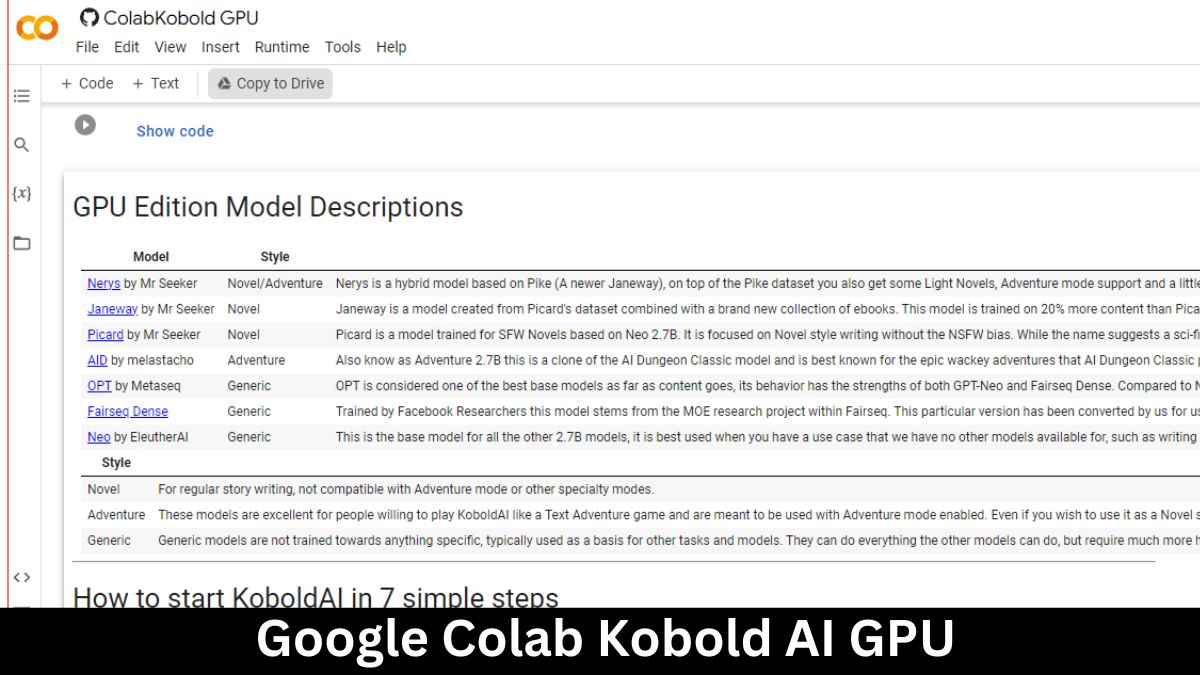
- Execute Setup Process: Once you’re in Google Colab, click the Run button to run the setup process for Kobold AI. This will initiate the necessary configurations and installations.
- Audio Generation: As part of the setup, an audio will be generated and played to prevent any timeouts during the process. This step ensures that the Colab session remains active throughout the setup duration.
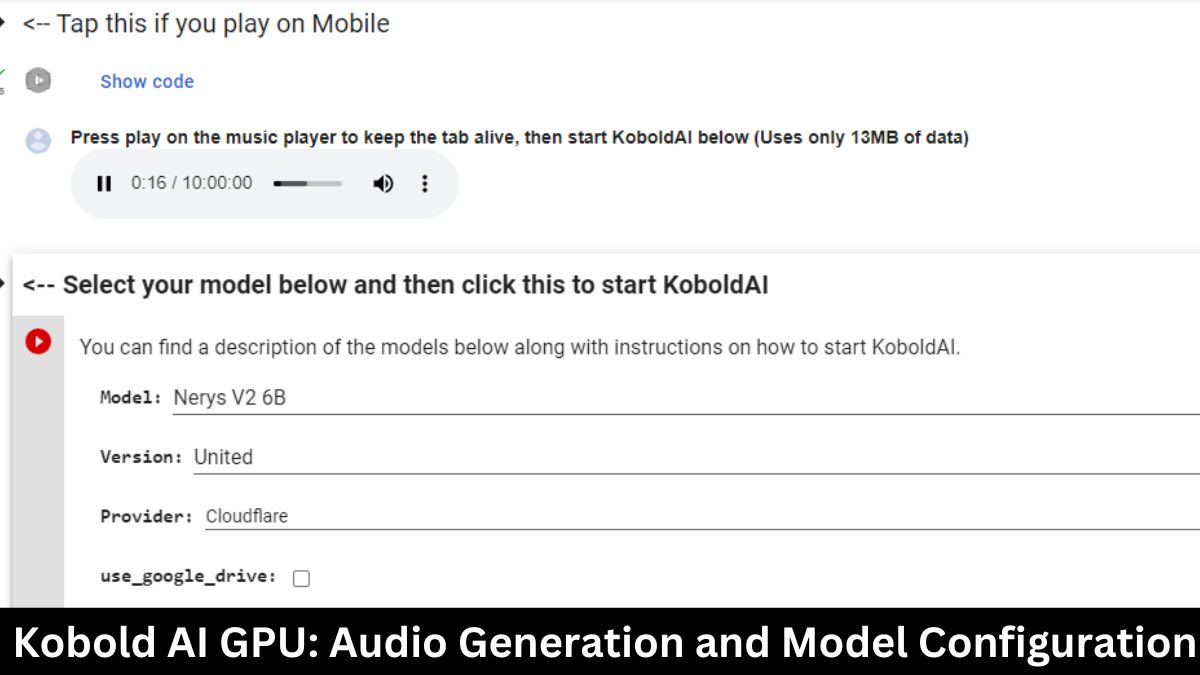
- Model Configuration: In the setup process, you’ll be prompted to configure specific settings for Kobold AI. Provide the following information:
- Model: Select “Nerys V2 6B” as the desired model for generating responses.
- Version: Choose the “United” version of the model.
- Provider: Opt for “Cloudflare” as the provider for efficient API access.
- Google Drive Usage: Set this option to “off” unless you specifically require Google Drive integration.
- Initiate Configuration: After entering the model, version, provider, and Google Drive settings, click the Play button to start the configuration process. The setup may take around 7 to 10 minutes to complete.
- Obtain API URLs: Once the configuration process finishes, you will see the generated API URLs. These URLs provide access to the Kobold AI API, enabling interactions and generating responses.
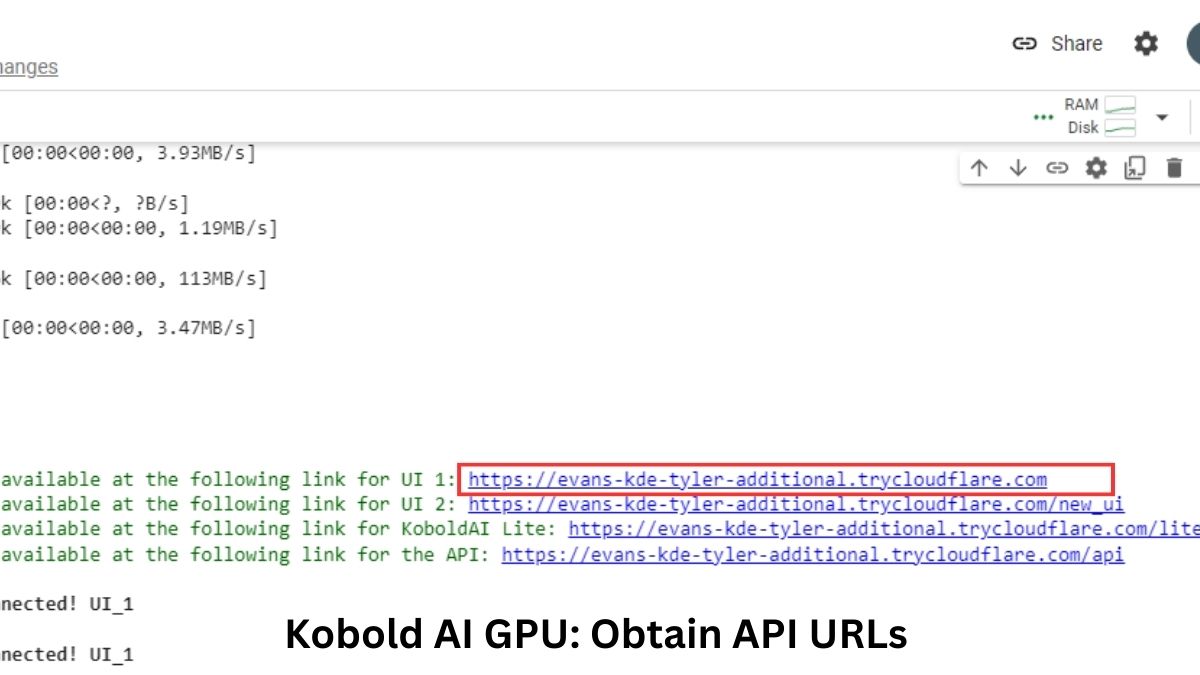
- Configure API URL in Janitor AI: Copy the API URL generated by Kobold AI. Switch to Janitor AI and navigate to the settings section where you can configure external API integrations. Paste the copied API URL in the designated field for Kobold AI API.
- Validate API URL: Click the “Check Kobold URL” button to validate the provided API URL. Janitor AI will verify the connection and ensure the URL is correct.
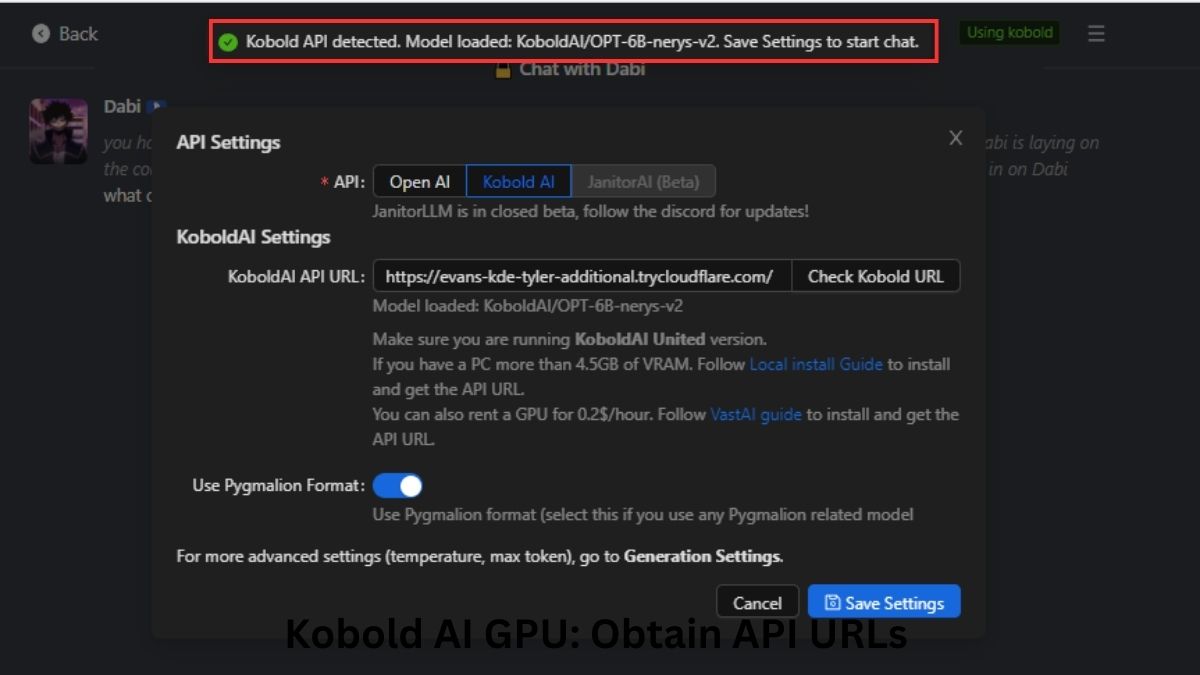
- Save Settings: If the validation is successful, save the settings in Janitor AI to apply the configured Kobold AI API URL.
- Generation Settings: Proceed to the Generation Settings section within Janitor AI. Choose the “Kobold AI Default” preset settings to utilize the recommended configurations for optimal results.
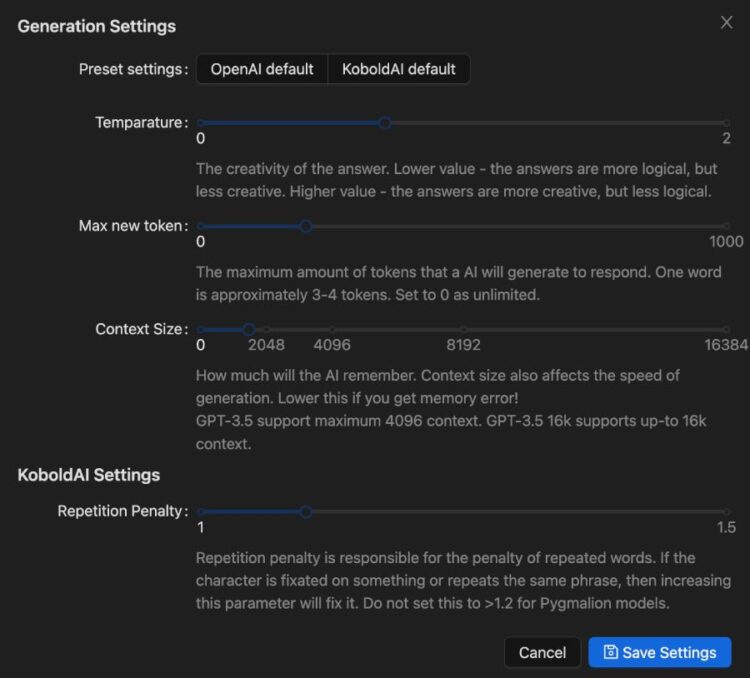
- Save and Start Chatting: Save the generation settings and begin your chatbot interactions in Janitor AI with the integrated power of Kobold AI. Enjoy generating compelling stories, engaging dialogues, and more.
In conclusion, using Janitor AI is a straightforward process that allows you to create and interact with AI-powered chatbots. By following these steps and embracing the features and tools provided by Janitor AI, you can create compelling chatbot experiences tailored to your specific needs. Enjoy the process of shaping unique characters and engaging in dynamic conversations with AI-powered chatbots through Janitor AI.
